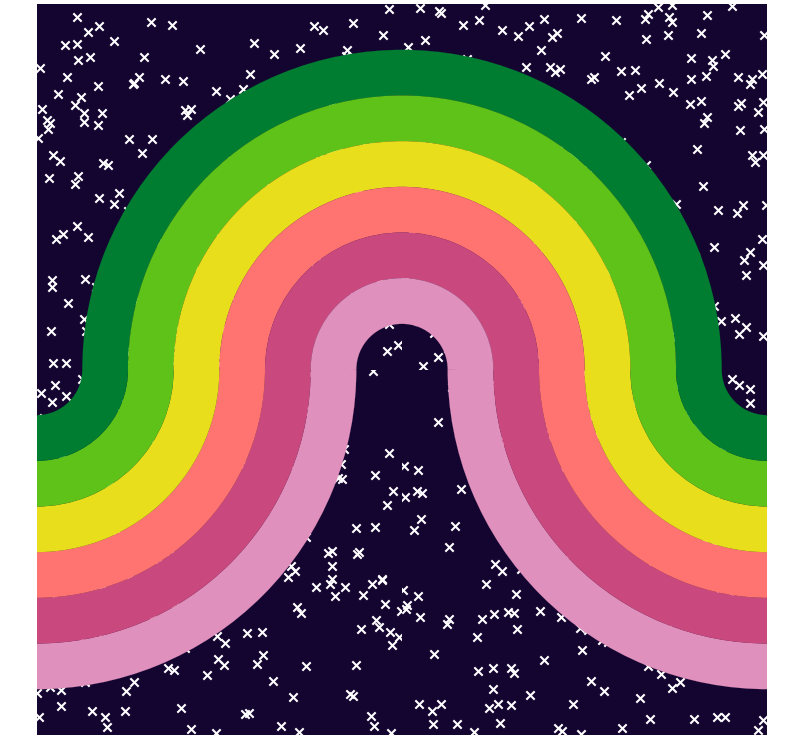
@dorafc has been working on a quilt. I thought it would be fun to re-create the quilt in Matplotlib and used it as an opportunity to work with the low level API. This example shows how to
- create and add
WedgeandRectanglepatches to theAxes - use transforms to rotate, scale, and shift your data before handing it off the the normal data -> screen tranfrom stack
The default colors in the functions match the colors of the physical quilt @dorafc is making.
import matplotlib.pyplot as plt
import matplotlib.patches as mpatches
import matplotlib.transforms as mtransforms
import numpy as np


def make_block(ax, colors, background, *, origin=(0, 0), rotation=0, width=1):
    """
    Draw a single block of the LOOPER Quilt

    This is inspired by the LOOPER quilt pattern.  If you are interested in making
    this quilt please see

    https://www.missmake.com/shop/looper-quilt-pattern-pdf

    Parameters
    ----------
    ax : Axes
       The axes to draw to

    colors : List[mpl_color]
       The colors to use for the arcs from the inside out

    background : mpl_color
        The color of the background

    origin : Tuple[float, float]
        Where the origin of the arcs should be

    rotation : float
        The rotation around the origin of the panel

    width : float
        The width of the panel

    Returns
    -------
    dict
       Keys are: 'background', 'stars', 'rings'
    """
    # convert to radians
    rad_rot = np.deg2rad(rotation)
    # set up the transform so we can work in the unit square below:
    # first rotate the coordinate system
    #   then scale to the proper width
    #   then translate to the correct origin
    #   then add the data -> screen transform
    trans = (
        mtransforms.Affine2D().rotate(rad_rot).scale(width).translate(*origin)
        + ax.transData
    )

    # sort out the width of each component
    arc_width = 1 / (len(colors) + 2)

    # make the background patch.  Technically in the quilt this is 2
    # pieces, but it is easier to just use one square here
    back_ret = mpatches.Rectangle(
        (0, 0), 1, 1, color=background, zorder=0, transform=trans, lw=0, clip_on=False,
    )
    ax.add_patch(back_ret)

    # add some star pattern to the background
    sc = ax.scatter(
        np.random.random(200),
        np.random.random(200),
        color="w",
        marker="x",
        zorder=1,
        transform=trans,
        clip_path=(back_ret.get_path(), back_ret.get_transform()),
    )

    rings = []

    # for each color use the wedge patch to draw the rings
    for j, c in enumerate(colors):
        circ = mpatches.Wedge(
            # centered at 0, 0 in our pre-transformed space
            (0, 0),
            # the outer width current count + 2 (one for the inner
            # most background, one because this is the outer diameter
            # of the ring
            (j + 2) * arc_width,
            # if width is given is back towards the origin from the radius
            width=arc_width,
            # go half a degree past the true to avoid slight aliasing issues
            theta1=-.5,
            theta2=90.5,
            # set the zorder just to be safe
            zorder=len(colors) + 2 - j,
            # set the color
            color=c,
            # use the transform we defined above
            transform=trans,
            # give a very small width to the edge to avoid aliasing issues
            linewidth=0.1,
            # clip the wedge to the background patch (to work around
            # making them a bit too wide above).  This means the Axes no longer
            # clips this artist.
            clip_path=(back_ret.get_path(), back_ret.get_transform()),
        )
        ax.add_patch(circ)
        rings.append(circ)

    return {"background": back_ret, "stars": sc, "rings": rings}


def make_quilt(
    colors=("#007d30", "#5fc219", "#e8de1c", "#ff7370", "#c9497e", "#e090bc"),
    background="#140430",
    *,
    width=1,
):
    """
    Make a baby-sized quilt

    Parameters
    ----------
    colors : List[mpl_color]
       The colors to use for the arcs from the inside out

    background : mpl_color
        The color of the background

    width : float
        The width of each panel

    """
    fig, ax = plt.subplots(constrained_layout=True)

    # set up the Axes
    ax.set_aspect("equal")
    ax.axis("off")
    ax.margins(0)

    return {
        "fig": fig,
        "ax": ax,
        "blocks": {
            "A": make_block(ax, colors[::-1], background, width=width),
            "B": make_block(ax, colors[::-1], background, rotation=90, width=width),
            "C": make_block(
                ax, colors, background, rotation=270, origin=(-width, 0), width=width
            ),
            "D": make_block(
                ax, colors, background, rotation=180, origin=(width, 0), width=width
            ),
        },
    }